
Add a red border to an image in WordPress
Do you want to draw a red border around a button in a WordPress screenshot or highlight a specific detail in an image? With neo Draw you can mark an image with a red border without leaving WordPress. Circles, arrows, text and freehand drawings work the same way.
The annotations remain individually selectable. That way you can move, resize, recolor or remove a border later. This is useful for guides, support screenshots, featured images and graphics in the style of a YouTube thumbnail.
Quick overview
- Install neo Draw and activate it in WordPress.
- Select an existing image in Gutenberg, Bricks, Elementor or the Media Library.
- Open the neoDraw image editor.
- Select rectangle, circle, arrow or freehand pen.
- Set color, stroke width and position.
- Save the editable version to the Media Library.
Install neo Draw and activate it in WordPress
First download neo Draw from the neoDraw plugin page. Then open Plugins > Add New > Upload Plugin in the WordPress backend, choose the ZIP file and activate the plugin. Alternatively you can find neo Draw in the WordPress Plugin Directory.
After activation the image editor appears on supported image elements and in the WordPress Media Library. For a quick look inside the editor you can also open the neoDraw demo directly in your browser.
Mark image with a red border: directly in WordPress
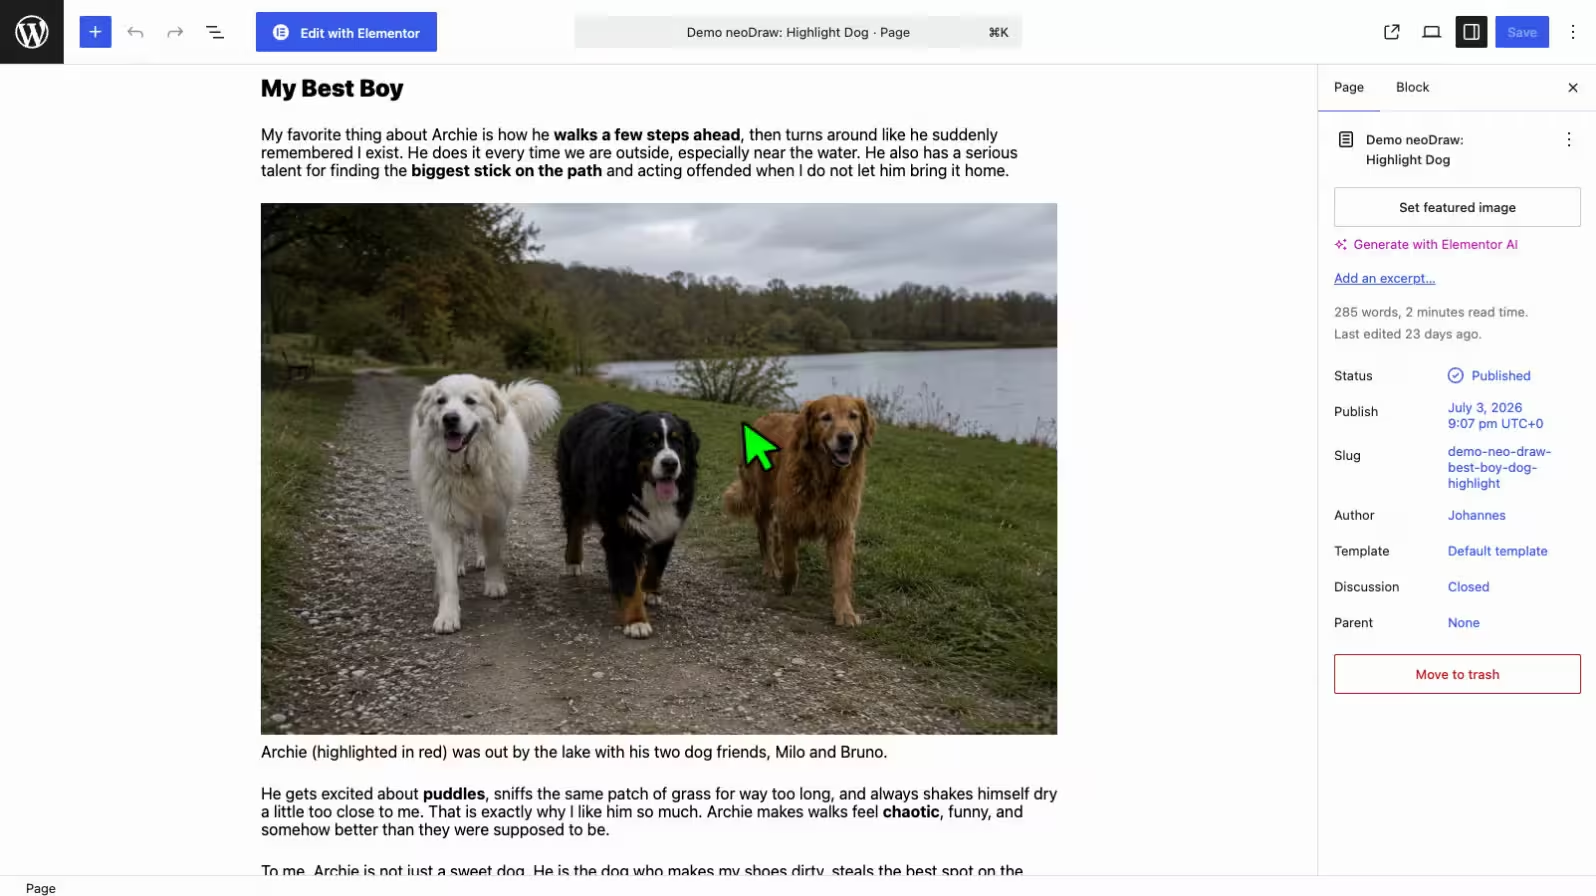
In the following video a group photo is selected in the Gutenberg editor. neo Draw opens the image, draws a red border around Archie on the right and saves the marked version. The process takes only a few seconds.
It works the same way for a screenshot: instead of a person or animal you can frame a button, an input field or an error message, for example.
neo Draw opens an existing image in WordPress and marks Archie on the right with a red border.
How to mark an area in the image
1. Select the image in WordPress
Open the post or page with the desired image. Click the image block in Gutenberg or select the image element in Bricks or Elementor. You can also start directly in the WordPress Media Library.
For screenshots use a sufficiently large source file if possible. An annotation remains more legible if the screenshot was not already heavily downscaled before editing.
2. Open the image editor
Open neo Draw using the button on the selected image. When you import an existing JPG or PNG image a new SVG drawing is created. The original image remains in the media library.
The new version contains the source image and all added elements. This lets you edit frames and arrows later independently of the photo.
3. Insert a red frame into the image
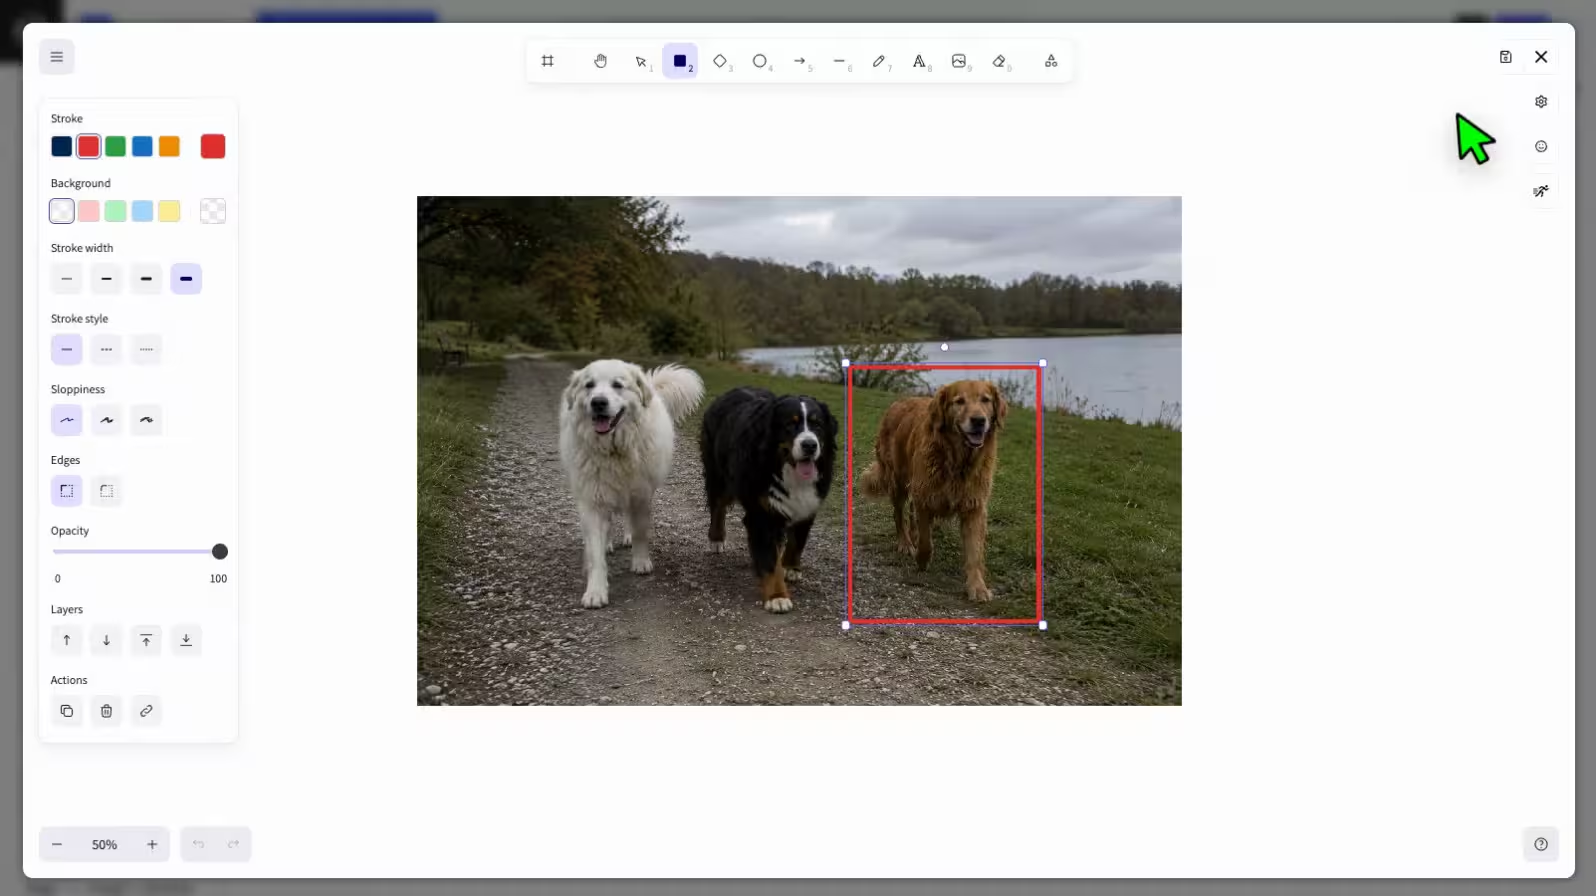
Select the rectangle tool and drag the frame from one corner of the desired area to the opposite corner. Set the fill to transparent and choose red for the stroke. In the Archie example the line is eight pixels wide so it remains visible even in a smaller preview of the large photo.
The frame should not touch the subject. A little spacing makes it clearer which object is meant and does not cover important details.
4. Add an arrow circle or freehand mark
Not every area fits a rectangle. Use a circle to highlight a small detail a arrow to direct attention to an exact spot and the freehand pen for a short underline or a hand-drawn outline. Text can also be placed directly on the graphic.
Each element can have its own color opacity and stroke width. Still prefer one or two consistent signal colors. Too many different markings compete with each other.
5. Adjust the marking and save the image
Check the result at a smaller zoom level. The frame must still be recognizable but must not cover the subject. Move or scale it if necessary.
Then save the drawing in the WordPress media library. It can be inserted like a normal image into posts and page builders. If the screenshot changes later open the SVG drawing again and adjust the marking.
Move and edit red frames later
A fully flattened PNG contains only a flat raster image. A moved button or a changed label then often means you have to rebuild the screenshot.
In a neoDraw drawing the red frame remains its own element. You can select it move rotate scale or recolor it. The same applies to circles arrows lines and text. This editability is especially useful for WordPress guides that need updating after an update.
Red frames arrows circles and hand drawings
A red rectangle is only one option. For a small switch a circle often fits better. An arrow points to an exact position without fully enclosing the element. With the pen you can underline a term or trace an irregular shape.

Labels are also possible. Keep them short and place them next to the marked object. This keeps the screenshot understandable even if it appears in a narrow column or on a smartphone.

Mark an image like a YouTube thumbnail
On a thumbnail the marking must also work at very small sizes. Do not make the frame too thin and focus on a single main subject. In the example three dogs stand by the lake. The red frame around Archie on the right immediately answers which dog is meant.
An extra arrow or a short text can help. Several frames three arrows and long labels make the preview image harder to read. Check the result at about 320 pixels wide before publishing.
Image markings in Bricks, Gutenberg and Elementor
neo Draw integrates directly into Bricks, Gutenberg, Elementor and the Classic Editor. There you open image editing on the respective image element. In other page builders you can select the marked SVG graphic via the normal WordPress media library.
Editing is not tied to the page builder. An image marked in Gutenberg can later also be used in Bricks and reopened via the media library.
Which color and line thickness fits?
- Red: stands out quickly on light, green and blue surfaces.
- Yellow or White: can be more legible on dark screenshots.
- Dark blue or Black: is suitable for very bright motifs with red controls.
- Line thickness: must match the final display size. Check not only the large editor view.
- Spacing: leave some air between the contour and the marked object.
A red frame on a red button has hardly any contrast. In that case choose a different signal color instead of forcing red just for the typical thumbnail look.
Frequently asked questions about marking images in WordPress
Why neo WP?
Why should you choose neo WP?You get an entire universe of specialized media plugins for modern media management in WordPress. Included are perfectly coordinated tools for renaming, replacing, optimizing, drawing, animating and managing media. Each plugin is designed to improve your SEO ranking, boost your site performance and save you valuable time when creating content.
With the Pro version you get all features in a single plugin. One ZIP file, one settings page, one update and full control. In the neoPlugin settings you activate exactly the features you need.
Behind neo WP is a dedicated team of experienced web developers. With great attention to detail and a strong commitment to code quality we continuously develop the neo universe.
neo Plugins Free vs. Pro
What is the difference between Free and Pro?With the Free version you get all neo plugins with their basic functions. On the download page you can download the plugins individually or install directly with the neoPlugins ZIP. After installation the neo plugins appear as separate entries in the WordPress backend and must be managed and updated separately. Support is provided via the public WordPress forum.
With the Pro version you get all neo plugins including all Pro features in a single ZIP file. You upload only that one file and then find all features as one plugin entry in your dashboard. Through the plugin overview in settings you toggle exactly the modules you need. All Pro features with the crown icon 👑 are available to you immediately. These include, for example, showing all posts that use a particular image, bulk actions in neoRenamer, an advanced animation editor for drawings and much more. Thanks to automatic security and feature updates you always stay up to date. Newly released media plugins and tools will be included in the future at no extra cost. With the Pro version you also enjoy prioritized premium support directly from the development team.
So if you want to save time, stay flexible and use all professional features immediately, the Pro version is right for you.
Security & privacy?
How secure is the plugin?All neo plugins are regularly updated, hosted on German servers and fully comply with European data protection regulations (GDPR). In addition all updates are intensively tested by experienced WordPress professionals before release.
Demo and trial version
Is there a demo version?Yes! You can test all neo plugins directly in the online sandbox without installation. You also have the option to test all neoPro features on your own WordPress site free for 14 days. You can activate this trial period in the WordPress backend under the neoWP settings. This lets you find out calmly whether neo WP is right for you.
Change neon colors
Why are the colors so bright?We are often asked: Why pink and green? What is going on with the colors? Why do I still see the plugin when I close my eyes? We wanted to stand out. If you want to give your optic nerve a break: In the Pro version you automatically get a calmer color scheme in dark blue and gold. Many users have fallen in love with the neon colors. Therefore there is a color scheme switch in the Pro settings.
Feature request?
Can I submit feature requests?Yes! The neo WP team welcomes feedback, ideas and suggestions. Everything that lands in our suggestion box will be discussed by the team. We respond to every piece of feedback.
Multilingual?
Is the plugin multilingual?Yes, all neo plugins support multiple languages, including English and German. If a language is not yet available, the English version will be displayed automatically.
After purchase
What happens after purchase?After purchase you will receive two emails with your invoice, the download link and your personal license key. If the emails do not appear in your inbox, check the spam folder. Alternatively, you can find all information in your account. You can then easily install the plugin in your WordPress dashboard as a ZIP file via "Plugins > Add New > Upload Plugin" and enter the license key. You can then delete the free neo plugins, they are no longer needed. Existing settings and content are of course preserved when switching from Free to Pro.
Multiple websites
Which license do I need for multiple websites?There are licenses for 1, 5 or 25 websites. Each production website uses one slot within the license - including within a WordPress multisite installation. Development, test, staging or local environments are free and do not require their own license, provided they are assigned to a licensed production site. Discounted license packages for 5 or 25 websites can be selected directly via the pricing table or at checkout. If you need more than 25 licenses, contact us by email.
Move license
Can I move a license to another domain?Yes! A domain change is possible without any problems. You can deactivate the license on the old domain and then reactivate it on the new domain. The assignment of licenses to domains can alternatively be viewed and adjusted at any time in the account. The access data were sent to you by email from neo-wp.com when you purchased the license. If you have any questions or problems, we will be happy to help.
Mark image, save and edit later
For a red frame you do not need to leave WordPress. Install neo Draw, open the desired image and draw the appropriate marking over the relevant area. The new version lands in the media library and can be used immediately in your post.
If the subject or the WordPress interface changes later, adjust the frame, arrow or label again. The original image remains intact.

